To e-mail a presentation to your customers, it is often necessary to optimize its size! The good news is that PowerPoint includes features to do so. They will allow you to carry out this project, and transfer a light-weight attachment rather than a well-loaded WeTransfer.
Two steps we recommend are:
1. Optimize the images ;
2. Optimize the videos.
Here’s how to do it!
Articles related
1. Optimize images 📷
Your presentation’s file size can be explained by the presence of high-resolution images or photos. This level of detail is useful if you want to print your presentation on billboards several meters high and wide, less if it is simply intended to be viewed on a computer screen, television, or printed on A4 paper!
Compressing your presentation’s images is very simple:
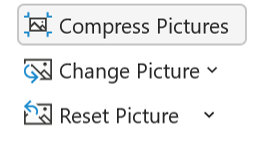
1. Double-click on one of the images, then – in the “Format” ribbon that appears at the top of your screen – click on “Compress Pictures”.
2. Uncheck the “Apply only to this picture” box and select “Print (220 dpi)” in the window that opens. This resolution should suit your purpose!
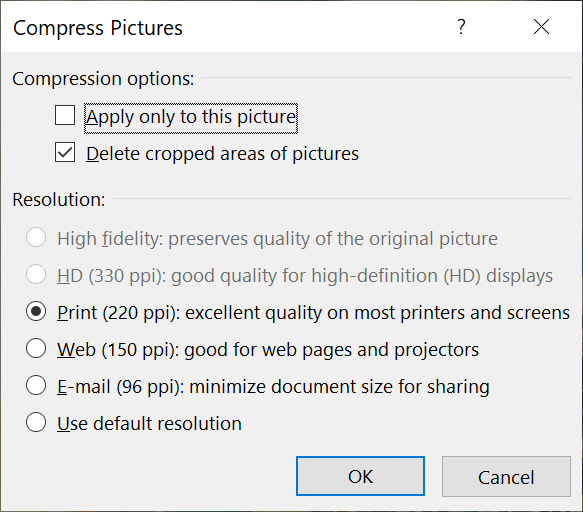
Note: if the “220 dpi” option is not available, you can repeat the same procedure on another image.
Slide Master
Remember to follow the same procedure for the slide master images (menu View > Slide Mask) and globally… avoid putting pictures in your slide master! (their weight impacts all the slides, rather than a single slide).
.jpg vs .png
For “photo” type illustrations, remember to use the .jpg format (and not .png) – their weight can then be divided by 10, without loss of quality! (right click > Save as…: .jpg, before reintegrating the image) [see also point 3 – Expert mode – to identify them].
Then compare the weight of your original presentation and the newly created one. It’s better, isn’t it?
Let’s continue by optimizing another media type (often heavier than images): videos.
2. Optimize videos 📹
In this section, we will distinguish two types of videos:
2.1 over one minute long (which are a priori the heaviest in weight);
2.2 less than one minute long (a priori the lightest).
2.1 Videos longer than one minute ⌛
Our recommendation for longer/heavier videos is… to host them online, outside of your presentation! PowerPoint allows you to integrate videos directly from Youtube or Vimeo, it’s the perfect opportunity to lighten the weight of your presentation as much as possible.
Two options there too :
1 – either directly integrate the Youtube or Vimeo player in your presentation (the procedure is perfectly explained to you by our Microsoft comrades in the article Insert a video or a YouTube video link) ;
2 – or integrate a screenshot of the video, including the “Play” logo, with a redirection (hypertext link) to the online version of the video.
Note that creating this screenshot will also be useful if you choose option 1 (in Edit mode, the preview of the video is a black screen otherwise), to which you can add a disappearing animation when the presentation switches to SlideShow mode.
The advantage is then doubled :
– your presentation is lighter ;
– your client can access the video via the hyperlink, even after PDF conversion!
2.2 Videos less than one minute long ⚡
For videos less than one minute long, you can use PowerPoint’s native compression feature.
Please note that this step is best performed after step 2.1, since the compression will be done on all the videos in the presentation.
1. In PowerPoint, go to “File” > “Info”> and then click on “Compress Media”. Choose HD quality (720p) [or “Internet Quality” on Mac].
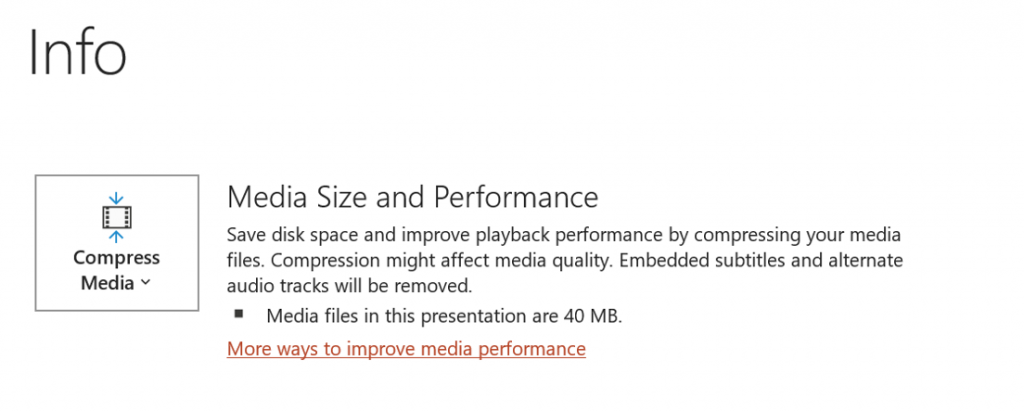
2. PowerPoint then compresses your videos (a loading bar allows you to follow its progress) and tells you the weight gained on each media after conversion.
3. Once it’s finished, save (“Save as…”) your presentation under another name, so that you don’t lose your original presentation.
3. Expert mode: find the heaviest elements of your presentation
A trick to spot the elements that weigh the most in a presentation?
1. Make a copy of your .pptx file and rename the .pptx extension to .zip.
2. Open it and go to \ppt\media
3. Sort files by descending size
4. Open the heaviest ones to identify the elements to be optimized in the presentation (the file name does not necessarily speak for itself!) – especially the very heavy .png photos that you may need to convert to .jpg [see the end of point 1. Optimize images].
5. Replace the heavy elements identified by lighter ones, whether they are images (see point 1. Optimize images) or videos (point 2. Optimize videos).
Did you follow all these tips carefully?
Then compare the weight of your last presentation file with the very first one. If everything went well, chances are the size of your presentation has been divided by more than 10!
So, mission accomplished? 👌
Bricks.ai is online software that helps your Marketing and Sales teams to gain productivity by automating the personalization and harmonization of your presentations and sales documents. Find out more about it!